FieldAgent Desktop - Installation Best Practices And Troubleshooting
1 FieldAgent Desktop Requirements
Prior to installing FieldAgent Desktop there are some requirements that must be met. For the software prerequisites, FieldAgent™ Desktop will automatically install them if they are not already installed. You will need local administration rights in order to install the software prerequisites. For some enterprise level users, temporary administration rights may need to be granted to the end user in order to install the prerequisites. See your system administrator for more details.
1.1 Software Prerequisites
Software requirements include:
- Microsoft .NET Framework
4.8 (x86 and x64). If the PC is current
on Windows updates,
this version of .Net is already installed. http://installs.sentera.com/fieldagent/DotNetFX48/
- SQL Server 2014 Express Local DB http://installs.sentera.com/fieldagent/SqlLocalDB2014/x64/sqllocaldb.msi
- Visual C ++ 2015-2019 Redistributable (64) http://installs.sentera.com/fieldagent/vcredist_x64/vc_redist.x64.exe
1.2 Hardware Prerequisites
Hardware requirements include:
- 64-Bit version of Windows 10
- 8GB of
RAM
- 4 Core CPU, 8 Processing Threads
- 50+ GB of free
diskspace. (It is recommended that you have at
least 100 to 200 GB of free space,
as this is used to store images on the PC.)
- 1280x1024 minimum screen resolution
1.3 User
Account Requirements
User account requirements include:
- User must be able to install applications into their profile.
For example, Local Admin Privileges.
- User must be able to access https://installsprod.sentera.com/fieldagent/
- FieldAgent must be able to make HTTP requests to api.sentera.com
- User must be able to store data on a local, non-removable disk.
- Latest .NET and Windows updates should be applied. This is not necessary except for version 4.8 of the .NET framework.
2 Download and Install FieldAgent Desktop
1. Navigate to https://installsprod.sentera.com/fieldagent/
2. Select Install FieldAgent.
3. Validate that the PC meets the system requirements.
4.
Click at the
bottom of the window.
5. Select a location where to save the file. The Downloads folder is typically the default.
6. Open the folder where the file was saved and double-click setup.exe to launch the install.
7. Click Accept to install SQL Server 2014 Express LocalDB, as shown in Figure 1
Figure 1: Click Accept
8. Click Install to install the Visual C++ 2015-2019 redistributable (x64) application, as shown in Figure 2.
11. The files for FieldAgent Desktop are downloaded and the FieldAgent Desktop insatllation is autonomous going forward, as shown in Figure 5.
Figure 5: Installation Dialog Box
12. Once the install is complete, the Sign In dialog box for FieldAgent displays.
3 Sign into FieldAgent Desktop
1. Type in the Email (User ID) and Password for heFieldAgent users, as shown in Figure 6.
2. If this is the first time the user is logging into FieldAgent, user details must be updated and force a password change. Click Register, as shown in Figure 7.
Figure 7: Click Register
3. Once complete, FieldAgent will finish the installation and displays the main Map window.
4 Troubleshooting the Install
There are a few reasons why the installation may fail. The following section describes the most common ones.
4.1 Another User Logged On
If another user is already signed into FieldAgent on this PC, an error message displays, as shown in Figure 8.
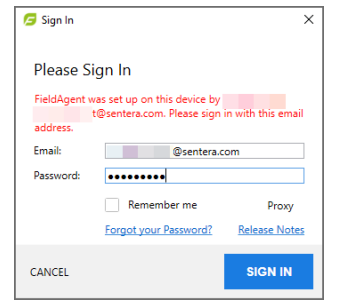
Figure 8: Error Message
To correct this issue:
1. Download and run Sentera Tool as the local administrator on the PC http://installs.sentera.com/tools/setup.exe
2. Launch the installer. It will automatically open when complete.
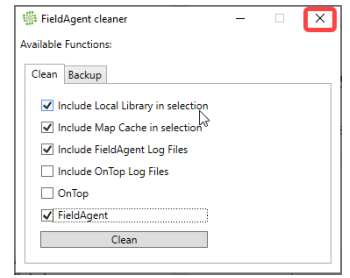
3. Select the check boxes shown in the Figure 9 and click Clean.
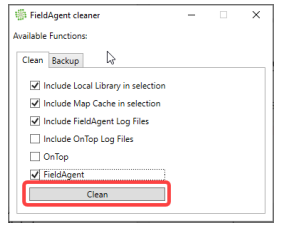
Figure 9: Click Clean
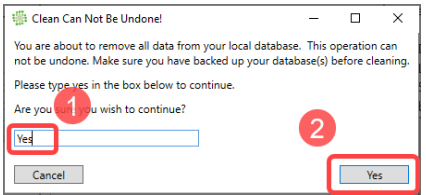
4. Type Yes in the confirmation box and then click Yes, as shown in Figure 10.
Figure 10: Click Yes
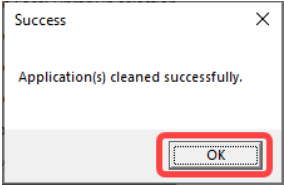
5. Let the process run and when complete, click OK, as shown in Figure 11.
Figure 11: Click OK
6. Close the FieldAgent cleaner window by clicking the x box in the upper right-hand corner of the dialog box, as shown in Figure 12.
Figure 12: Click Close
7. Launch FieldAgent Desktop and login.
8. Uninstall the Sentera Tool from the PC and delete the Installer App.
4.2 Stop Tasks
If this process fails, the most likely cause is a background process is preventing from this process completing. To fix this issue:
1. Launch Task Manager.
2. Sort the processes by Name.
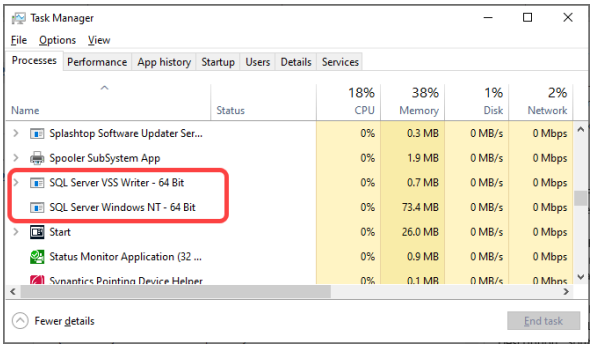
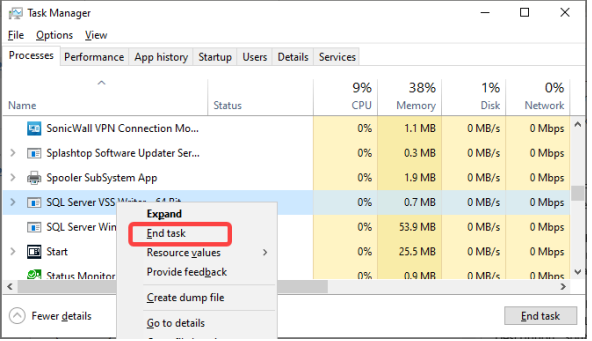
Figure 14: Select End Task
6. Close the Task Manager.
7. Rerun the Sentera Tool. After these processes are complete, the user can successfully login to FieldAgent.
8. Uninstall the Sentera Tool from the PC and delete the Installer App.
Related Articles
FieldAgent Desktop - Update Stitching Service
Update Follow these instructions to update the Sentera Stitching Service: Launch FieldAgent Desktop and update if necessary. Double-click on the Sentera Stitching icon to start an update process, if necessary. This can be found on your desktop or in ...FieldAgent Desktop - User Guide
Field Agent Desktop User Guide English Engineered in Minneapolis, MN, USA 14 April 2022 Doc #67002 Rev E Copyright © 2022. All rights reserved. Trademark Notice FieldAgent, AgVault, and Incident Light Sensor are registered trademarks of Sentera. ...FieldAgent Desktop - Sentera Stitching Service Install Manual
1 Requirements for Installing 1.1 PREREQUISITES Microsoft .NET Framework 4.6.1 (x86 and x64) 1.2 SYSTEM REQUIREMENTS A 64-bit version of Windows 8/10/11 Pro [help] 32 GB of RAM Minimum of a 4 core / 8 thread CPU 25 GB free disk space Virtualization ...FieldAgent Mobile - Data Collection Best Practices
NOTE: FieldAgent Mobile will now alert you when your flight plan will result in missed images. This warning applies to the onboard cameras for all DJI drones, as well as DJI Skyport enabled Sentera Sensors. DJI controlled sensors are only able to ...FieldAgent Mobile - Single Sensor Gimbal Installation Steps
Installing a gimbal on an Phantom 4 with a previously installed Sentera Single Sensor requires both hardware and software updates. To complete this process, scroll to the bottom of the page to download the three attachments: 1. Single Gimbal - ...