FieldAgent Desktop - Sentera Stitching Service Install Manual
1 Requirements for Installing
1.1 PREREQUISITES
- Microsoft .NET Framework 4.6.1 (x86 and x64)
1.2 SYSTEM REQUIREMENTS
- A 64-bit version of Windows 8/10/11 Pro [help]
- 32 GB of RAM
- Minimum of a 4 core / 8 thread CPU
- 25 GB free disk space
- Virtualization must be enabled on your PC
- FieldAgent Desktop application must be installed on your PC
1.3 USER WINDOWS ACCOUNT REQUIREMENTS
- You must have a Windows administrator account on the machine.
- You must have a password on your Windows account.
- You must be able to access installs.sentera.com.
- Sentera Stitching Service Installer must be able to make HTTP requests to api.sentera.com.
- You must be able to store data on a local, non-removable disk.
- You should have the latest .NET and Windows patches applied (not necessary with the exception of version 4.6.1 of the .NET framework).
2 Download and Install
The purpose of this document is to guide a FieldAgent user through the download and installation of the Sentera Stitching Service. If you have any issues, contact Support at Sentera.
2.1 Stitching Service
1. Navigate to http://installs.sentera.com/stitching_service/
4. Open the folder where the file was saved, downloads is typically the default location.
2.2 Docker
Figure 4: Detect Docker Installation
3. If prompted, select Yes in the User Account Control dialog box, as shown in Figure 5.
Figure 6: Configuration
5. Docker for Windows installs. Once complete, an installation success notification displays, as shown in Figure 7.
Figure 7: Installation Success
6. Click Close.
 Note: Make sure that any work is saved before continuing with the next steps.
7. Click Start in the lower left corner of the screen, select Docker for the Windows icon as shown in Figure 8. It will take a few minutes to launch.
Figure 8: Windows Docker

8. If the WSL 2 Kernel is not installed or up-to-date, Docker will prompt to install the update. Select the link in the dialog box, as shown in Figure 9.
Figure 9: Click URL Link
9. The webpage will load on Step 4. Click the link for WSL2 Linux kernel update package for x64 machines, as shown in Figure 10.
Figure 10: Click WSL2 Link

10. Run the installer for the downloaded wsl_update_x64.exe file.
Figure 11: Click Next
12. If prompted, click Yes in the User Account Control dialog box, as shown in Figure 12.
Figure 12: Click Yes
13. Once the install of the wsl_update_x64.exe is complete, click Finish, as shown in Figure 13.
Figure 13: Click Finish
- "Start Docker Desktop when you log in"
- "Use the WSL 2 based engine"
- "Use Docker Compose V2"
16. Wait until Docker restarts and displays the message “Docker Desktop is running,” which will display in the hidden Icons menu on the windows task bar.

2.3 Configure the Stitching Service
9. After the successful installation of the Sentera Stitching Service, launch FieldAgent. An icon displays at the top right of the screen, which shows the status of any stitching job
 At the first launch of FieldAgent, after installation, the Sentera Stitching Service will attemtpt to stitch all fields. Automatic stitching takes place in the background every time you import a new survey. Once a field has been stitched, no notifications that it is complete displays. The newly stitched full mosaic will be automatically available in the FieldAgent Field View for the imported field and survey.
3 Manually Select a Field to Stitch
1. Navigate to the Field View screen for the field you want to stitch.
2. Select the survey date and then click the Stitching Icon to add the survey to the stitching queue.
3. The Stitching Service validates that it can process the images, then will let you know when the field is in the Stitching queue.
4. The survey chosen to stitch displays in the stitching queue. View the queue by clicking on the stitching Icon on the top right of the screen.
4 Troubleshoot
Note: Make sure it is a Restart and not a Shutdown or Hibernate of the PC. It really does matter.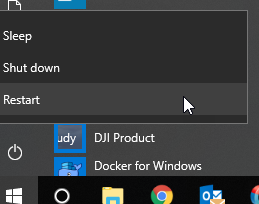
Figure 29: Restart
2. Once the computer has restarted, log into Windows. Wait until Docker reports that it is running before logging into FieldAgent.
3. If this doesn't solve the problem, then shut down Docker by selecting it from the hidden icons area, as shown in Figure 30.
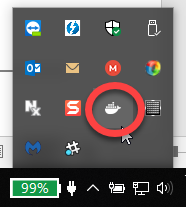
Figure 30: Hidden Icons Area
4. Right-click on the Docker icon and select Quit Docker, as shown in Figure 31.
Figure 31: Quit Docker
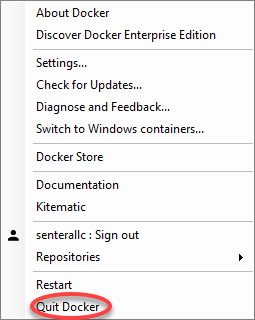
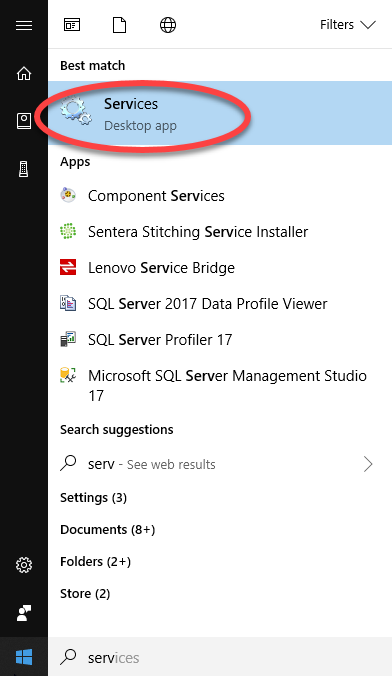
Figure 32: Services
6. Navigate to Sentera Stitching Service, right-click to select Stop, as shown in Figure 33.
Figure 33: Stop

7. Restart the computer.
8. Log in and then wait for the Docker to run.
9. Launch FieldAgent.
10. Repeat Step 6 to navigate the Services to determine if Sentera Stitching Services is running. If not, then right-click, and select Start.
5 Update Passwords
1. Click the Windows icon in the bottom left corner of the screen, as shown in Figure 34.
Figure 34: Windows Icon
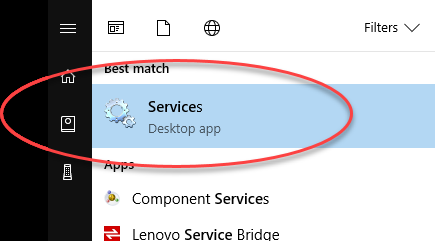
Figure 35: Services
3. Navigate to Sentera Stitching Service, as shown in Figure 36.

Figure 36: Sentera Stitching Service
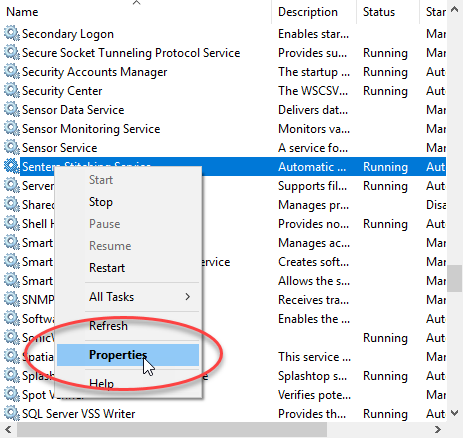
4. Right-click on Sentera Stitching Service and select Properties, as shown in Figure 37.
Figure 37: Properties
5. Type the new Windows password in both the Password and Confirm Password fields, as shown in Figure 38.

Figure 38: Password
6. Click OK to change your password.
6 Support
7 PDF guide download
Related Articles
FieldAgent Desktop - Update Stitching Service
Update Follow these instructions to update the Sentera Stitching Service: Launch FieldAgent Desktop and update if necessary. Double-click on the Sentera Stitching icon to start an update process, if necessary. This can be found on your desktop or in ...FieldAgent Desktop - User Guide
Field Agent Desktop User Guide English Engineered in Minneapolis, MN, USA 14 April 2022 Doc #67002 Rev E Copyright © 2022. All rights reserved. Trademark Notice FieldAgent, AgVault, and Incident Light Sensor are registered trademarks of Sentera. ...DJI - Phantom 4 Series Single Sensor User Manual
Scroll to the bottom of the page for the User Manual for the Sentera Single Sensor mounted on a DJI Phantom 4 Series Drone. This guide will give out basic instruction on Aircraft Setup, Sensor Usage and Flight Operations. If you need addition please ...FieldAgent Web - User Guide
Click below to download the FieldAgent Web User GuideSingle Sensor User Manuals
These guides provides basic instruction on Aircraft Setup, Sensor Usage, and Flight Operations. If you need additional information, call Support at Sentera at 612-204-2000. Contact Sentera Customer Support: Create a Support Ticket Here Email: ...